
How to: Implement and Leverage Magento Commerce Google Tag Manager (GTM)
E-commerce, How-To’s, Marketing and Analytics


What is Google Tag Manager?
Google Tag Manager helps a store’s Marketing team manage the tags, or snippets of code, that are related to their marketing campaign events. This could be Facebook’s Product View, Purchase or Add to Cart Events, or remarketing via AdRoll.
Through the ability to add tracking tags to your site you can measure the actions of your e-commerce customer, and personalize, retarget, or conduct search engine marketing initiatives based on actionable event data.
Prior to Google Tag Manager, a marketer may ask their Web Developer to implement Facebook Advertising. This would typically involve a developer place the provided Javascript into the <head> file of the application, and then using PHP, JS, JAVA, .NET or another programming language to fill out the dynamic fields which the tag required. These tags would often create congestion in code, slow down the website, but most importantly create a dependency on IT to manage Marketing tasks.
Moving into GTM, we are now able to create a standardization of data, collect data a single time, and then submit it to each party, without having IT ever need to write a single line of code! More importantly, if set up correctly, you may not need any IT help to track that next big social provider’s campaign.
Important Terms
- Events
- Events are actions that occur in e-commerce stores that drive behavioral data collection. This is as simple as “Viewed a page” to “Add to Cart” or “Purchase”
- Events are the engine behind GTM and drive everything that happens.
- While the format and name of Events are driven off of Google’s definition, it’s Magento’s responsibility to fire these events when a relating action occurs.
- Datalayer: See https://developers.google.com/tag-manager/enhanced-ecommerce
- This is Google’s standardized format for the definition of events and data made available by your e-commerce platform, in this case, Magento
- Below is an example of what the data layer may look like for the Add to Cart Event

- Tags
- Tags, these are those pesky Javascript snippets given to you by third-party software, such as Facebook, AdRoll, HotJar, HubSpot, and many others.

- Variables
- It might sound like we are going back to pre-algebra but a Variable is a reference to a data point in the “data layer” for example. In that earlier “addToCart” example, we may want to save or create a variable for the product added to the cart, in this case, the below is the “addToCart Product”


You might be asking how all these work, keep reading and find out!
How does it work?
Google Tag Manager directly transfers data and events to Google Analytics, Enhanced Ecommerce, and other third-party analytics solutions, to produce a clear picture of how well your site, products, and promotions are performing.
You should have a Google Analytics and Tag Manager account to continue this process. The following instructions walk you through the process of configuring your Google accounts, configuring your Magento store, and creating a tag.
Start Gathering Magento Actionable Marketing Data!
Step 1. Configure Your Google Analytics Account
See Google’s Set up Site Search for the basics you need to get started. Also see the Google guides for Google Analytics and Google Tag Manager.
- Sign in to your Google Analytics account.
- To enable Internal Site Search Tracking, do the following:
- Navigate to Select View > View Settings.
- Set Site Search Tracking to
On. - Set Query parameter to
q. - When complete, Save the settings.
- To enable display features, do the following:
- Choose Property Settings.
- Under Advertising Features, set Enable Demographics and Interest Reports to
On. - Save the settings.
- To enable Ecommerce Tracking, do the following:
- Navigate to Select View > Ecommerce Settings.
- Set Enable Ecommerce to
On. - Set Enable Enhanced Ecommerce Reporting to
On. - Save the settings.
- Reload the page to verify that all the settings remain
On.
Step 2. Configure Your Google Tag Manager Account
The following instructions show how to configure a new container with basic settings. A sample .txt file is used to simplify the process, importing to generate a tag in a new container. For this example, we recommend that you create a new container, rather than modify an existing container.
For additional information, see Google’s Container export and import. These instructions walk-through importing a sample .txt into a new container.
- Download the Canary Magento GTM template above
- Navigate to Admin > Container > Import Container.
- Click Choose container file and select the downloaded file.
- Under Choose workspace, click New.
- Enter a title and description, then click Save.
- Select one of the following actions to import the file:
- The Overwrite option should be selected for the new container.
- The Merge option should be selected is you are using an existing container.
- Click Preview to review the tags, triggers, and variables.
- To edit the Google Analytics ID that is referenced in variables, do the following:
- Navigate to Variables > User-Defined Variables.
- Choose Google Analytics. Then, update the placeholder (
UA-xxxxxx-x) with your own GA ID.
- Follow Google’s instructions to add tags, triggers, and variables to the new container.If you have settings in another container that you want to use, they can be moved to the new container.
- Click Confirm when complete.
- Follow Google’s instructions to publish the new container.
Step 3. Configure Your Store
- Log in to the Admin of your Magento store.
- On the Admin sidebar, go to Stores > Settings > Configuration.
- In the left panel, expand Sales and choose Google API.
- Expand
 the Google Analytics section and configure the following:Google API – Google Tag Manager
- Set Enable to
Yes. - Set Account type to
Google Tag Manager. - In the Container ID field, enter your GTM ID (
GTM-xxxxxx). - If you are also using Google Analytics to content experiments, set Enable Content Experiments to
Yes. - Use the default values for the remaining fields.
- Set Enable to
- When complete, click Save Config.
- Test your Google Tag Manager settings to verify that everything works correctly.
Step 4. Test that everything is working
- Login to Google Tag Manager
- In the top-right corner click “Preview”
- After the page refreshes go to your web store
- Once you navigate there, you should see the following panel

- This is your central dashboard which helps you understand what events are occurring within the Magento data layer, and more importantly to see what tags “will be” submitted once you publish the container.
- Inside here, you should see you Google UA – All Pages Tag being fired, and as you click around you website you can monitor the different events which occur during your actions.
Real-Life Examples
Please read over the definitions described earlier one more time, and then let’s get started! Now that we have Google Tag Manager working, and you can see the little preview screen, we’re ready to work on a few real-life examples.
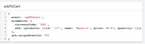
You walk into the office (ok it’s COVID world right now so that office is your couch in your living room), and your marketing manager just sent you these javascript snippets labeled Facebook Global and Add to Cart each with the instructions to add these into the <head> tag of your site. You might think, doesn’t Google Tag Manager insert data right into the head of my site, if you remembered yes from earlier, you’d be right.
So what you just received is what Google considers a “Tag” a little piece of javascript or an image that collects data. Some of these tags are meant to collect data on all pages, and some are quite specific such as the Facebook Add to Cart, where it should only be collecting Cart Data.
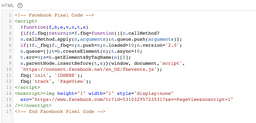
Let’s start with the Global Facebook Pixel, it’s job is to collect data as a user peruses the site, and then submit that back to Facebook to improve ads, and record metrics. So as the name implies, “Global” we’ll need this Tag to collect data on every page. So when working with GTM, you want to think backward e.g. Starting with where and why do I need to collect data, and then what finally what data do you need to collect. We start with Where, this page is a global pixel, so as the name implies, it needs to fire on every page. Fire, meaning an Event occurred. In this case, we already have a standard event called “Page View” which will work.
Next, now that we know we are going to have the Global Pixel inserted on the Event “Page View” we can then add our new Tag.
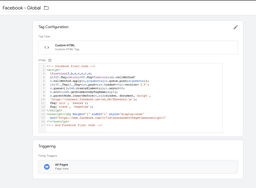
- Click on Tags
- Click on the “New” in the right hand corner
- A new panel appears
- In the top left, name this “Facebook – Global”
- Then click on “Tag Configuration”
- Google Tag Manager has many prebuilt tags, for third-parties, but Facebook isn’t one of them, so we select Custom HTML
- A new panel should appear, this is where you drop in that snippet you were given earlier
- Now Select “Triggering”, this is that magic feature says what events something will happen. In this case, select “All Pages / Page View” from the dropdown.
- Click Save
The end result will look like below
